Here’s Our Guide to Creating and Joining a Non-Dedicated ARK Server
Iceline Hosting
September 10, 2024 • 6 min read
ARK: Survival Evolved is a popular multiplayer survival game known for its cooperative gameplay and expansive open-world environment.
For many players, creating or joining a non-dedicated server is a cost-effective and flexible way to enjoy the game with friends. Unlike dedicated servers, non-dedicated servers offer a more relaxed setup, perfect for small groups and local play.
In this guide, we'll explain everything you need to know about creating and joining a non-dedicated server in ARK.
Iceline Hosting provides premium game server hosting, dedicated servers, web hosting, and DDoS protection. We have firsthand experience supporting gaming communities and consistently deliver high-quality performance and uptime.

Our customers benefit from seamless server experiences and reliable customer support.
Unlike many survival games, ARK allows you to host a non-dedicated server directly from the main menu, making it accessible to anyone who wants to play with friends without needing additional software or hardware.
Here are the steps:
To begin, launch ARK: Survival Evolved from your Steam library or another platform (such as Epic Games or Xbox). Once the game loads, you’ll arrive at the main menu.
Here, locate and select the “Host/Local” option.
This will take you to the server setup screen, where you can customize your server settings to match your preferences. The "Host/Local" option allows you to control the world you will play in and define the rules of your game session.
On the server setup screen, there are various options to tailor your gaming experience.
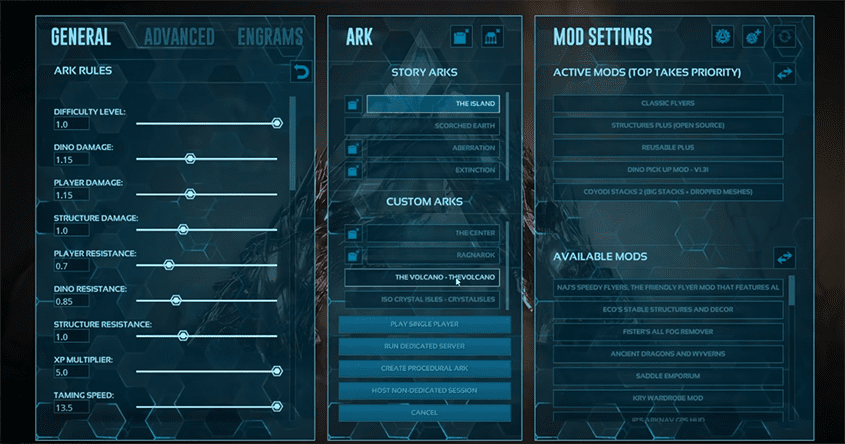
Here are the key settings to adjust:
Once you’ve configured all your desired settings, click the “Host Non-Dedicated Session” button on the screen. This will initiate the server, and the game will begin loading your session.
During this time, the game sets up your world according to your chosen parameters. As the host, you will spawn into the game world, and your non-dedicated server will now be live, ready for others to join.
The final step? Invite your friends. To do this, share the session name and password you set, and have them follow the steps below.
Once your friends have created a non-dedicated server, you can join them by following these steps:
From the main menu of ARK, select the “Join Ark” option. This will bring up a list of available servers.
To find your friend's server, use the Session Filter at the bottom left corner of the screen and set it to Non-Dedicated Sessions. This will narrow the results to show only non-dedicated servers.
If your friend has provided the session name and password, use the Search by Name filter at the top of the list to type in the server name. Once you find the session, select it and press Join… it really is that simple!
The host's computer should meet or exceed ARK’s recommended system requirements.

Ideally, you should have a powerful CPU (at least a quad-core processor), 16GB RAM or more, and a modern GPU with at least 4GB of VRAM. Insufficient hardware can lead to lag, lower frame rates, and poor performance for all players.
A stable, high-speed internet connection is also essential for hosting a non-dedicated server. The host’s connection must handle both the game data and the data for other players connecting to the server.
A minimum upload speed of 5 Mbps is suitable for small groups. However, higher speeds are better when multiple players are joining. A wired Ethernet connection is preferable to Wi-Fi to reduce latency and ensure a stable connection.
Ensure that there’s sufficient storage space available. ARK, along with its mods and saved game data, can take up a significant amount of disk space. It’s best to have at least 100GB of free space to accommodate the game. Also, using an SSD can help improve load times and overall game performance.
A non-dedicated server places a significant load on your computer. Ensure your computer has adequate cooling to avoid overheating, which can lead to thermal throttling and reduced performance. Also, ensure your power supply is stable and sufficient for your system’s needs.
Optimizing your system for better performance is essential—close unnecessary background applications to free up CPU and memory resources. You can also lower in-game graphics settings to reduce the load on your hardware for a better experience.
Want to play with friends without sacrificing game quality?
A dedicated server is the way to go. With this option, you rent a top-of-the-line machine from a provider like Iceline Hosting. This lets you max out graphics settings without any performance issues.
Since the server only runs when the host is online, it is important to save your progress frequently.
Use the “Save and Exit” option regularly to prevent loss of progress due to unexpected crashes or disconnects. Also, ensure your friends do not make major changes right before logging off to ensure their work is saved.
Effective communication is key when running a non-dedicated server.
Coordinate play sessions with your group to ensure everyone can join when the host is available. Also, set clear expectations about when the server will be online and discuss any potential changes to settings or mods before implementing them.
To protect your game progress, regularly back up your game files.
This is especially important if you plan to modify game settings or install new mods. Backing up your files ensures that you can restore your server to a previous state if something goes wrong, preventing potential data loss and frustration for your group.
Setting up a non-dedicated server is an easy way to host a personalized game session with friends. With this guide, you can easily create and join a non-dedicated ARK server, customize it to fit your gaming style, and explore the expansive world of ARK with others.
Want to experience the benefits of a dedicated ARK server? At Iceline Hosting, we offer affordable, reliable, dedicated server hosting for ARK that lets you and your friends experience the game at its absolute best.
Sign up for Iceline Hosting today.