How We Set Up and Host a Terraria Dedicated Server
Iceline Hosting
September 10, 2024 • 7 min read
Looking to elevate your Terraria gameplay? A dedicated server can be the key to unlocking enhanced customization, stability, and performance.
By setting up your own server, you can bypass public servers, tailor the game to your preferences, and enjoy a smoother, more controlled multiplayer experience.
This Iceline Hosting guide walks you through setting up a dedicated Terraria server, gives tips for customization, and provides best practices for optimal gameplay.
But before we do that…
At Iceline Hosting, we’ve helped countless gaming communities successfully set up and manage dedicated servers, including Terraria. Our expertise ensures reliable, high-performance servers with minimal lag and enhanced security, leading to smoother gameplay and higher player satisfaction.

A Terraria game server allows multiple players from different locations to connect and play the game together. After the server is set up, users can connect from different locations to play with or against each other, provided they have the server details.
Setting up a proper server enhances the multiplayer experience by reducing issues like lag, disconnections, hacks, and security breaches, ensuring smooth and exciting gameplay.
This is the simplest way to start a Terraria server where you can play with friends. A host player launches the game, clicks “Multiplayer,” and then clicks “Host & Play.” The main advantage is that no extra software or setup is needed.
However, there are significant limitations:
With this method, one player installs the Terraria dedicated server on their PC, and others can join using the IP address. This setup allows for mod installation and the expansion of the number of players.
However, it still comes with several downsides:
A dedicated server provider is the ultimate solution for hosting multiplayer Terraria servers.
With a hosting provider like Iceline Hosting, your server is hosted remotely on a top-of-the-line machine. Plus, you can manage your server with convenient game panels rather than technical know-how.
This type of hosting offers several benefits:
As we mentioned above, there are two ways to host a dedicated Terraria server—on a personal machine or by renting one from a provider like Iceline Hosting.
Here are step-by-step instructions for both options:

To start hosting a Terraria server on your computer, head to the official Terraria website. On the bottom of the page you’ll see links labeled “PC Dedicated Server” and “Mobile Dedicated Server”—clicking these will initiate a download.
After downloading the software, you'll need to configure the server settings to fit your gameplay preferences.
Here’s how:
Some important options to configure include:
To allow players outside of your local network to join, you'll need to set up port forwarding on your router. Log in to your router's settings (by entering its IP address in a web browser), navigate to the "Port Forwarding" section, and forward port 7777 (the default for Terraria) to your computer's local IP address.
Additionally, you may need to create a firewall rule to allow traffic on port 7777. Take security precautions by limiting access to trusted players and, if necessary, setting up a password for your server.
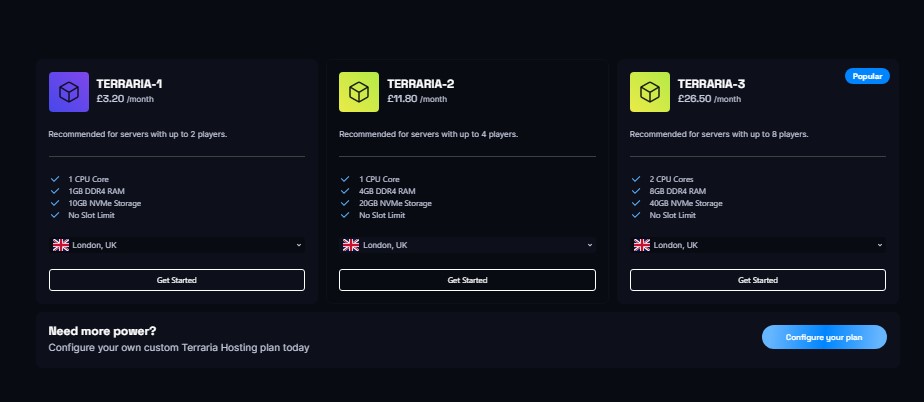
Go to Iceline Hosting and select a Terraria hosting plan that suits your needs. We offer excellent performance, security, and easy-to-use management tools. Upon purchase of a plan, you'll get login details that you can use to access the game management panel.
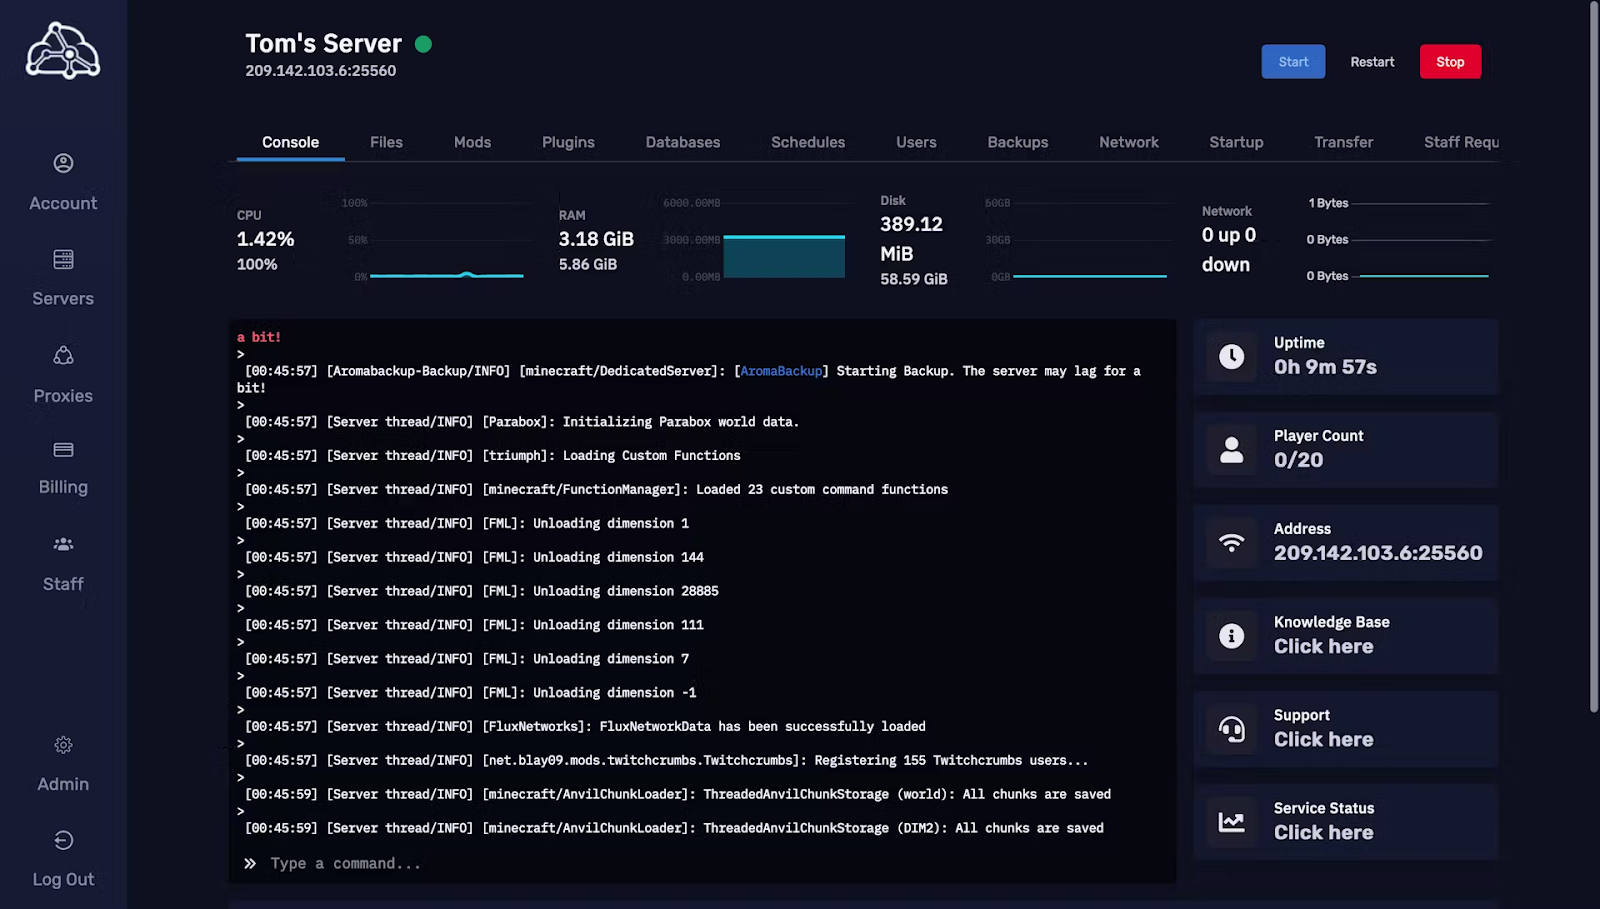
Log into the game panel using your login details.
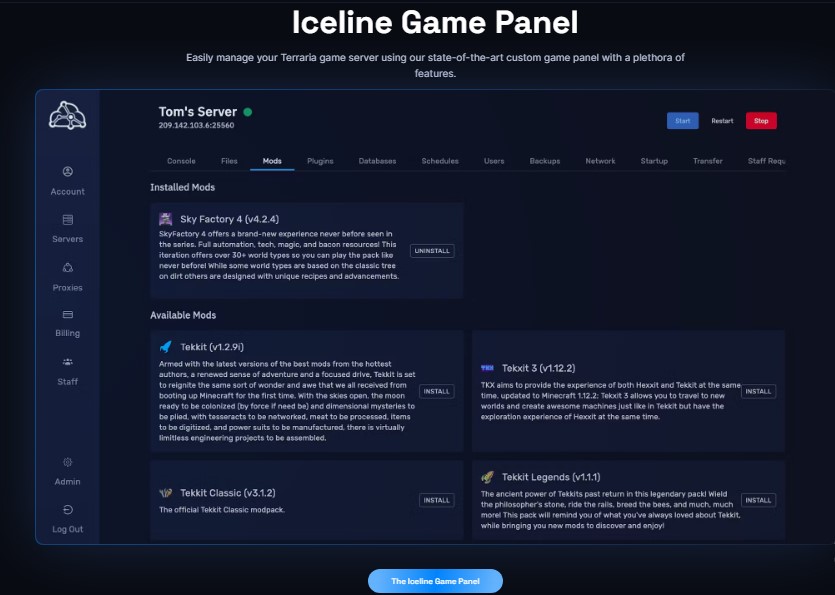
Once logged in, you will see a user-friendly interface where you can adjust world size, difficulty, and player limits to tailor the gameplay to your preferences.
Iceline Hosting provides powerful tools for ongoing server management:
Once your server is ready, it's time to invite players:
A Terraria server requires at least 512MB of RAM for a basic two-player game, though most standard servers need 1GB or more. As your player count increases, you must upgrade your server’s RAM and CPU power to maintain smooth gameplay.
If performance issues arise, reducing the maximum player count can help ensure a better experience for everyone. Additionally, tweaking gameplay variables can balance performance and user satisfaction.
Security is essential for protecting your server and its users. Iceline Hosting’s built-in DDoS protection helps safeguard your server from attacks, ensuring uninterrupted playtime. It's also important to regularly update your server software to patch any vulnerabilities and maintain strong security.
Another key factor is effectively managing passwords. Strong, unique passwords with a mix of uppercase, lowercase, numbers, and special characters help prevent unauthorized access. Regularly updating passwords further reduces security risks.
Monitoring your server’s resource usage is critical for maintaining optimal performance. The game panel provides real-time data on server health, allowing you to make adjustments as needed. If you notice that your server is frequently hitting its resource limits, upgrading to a higher plan will enhance performance and support more players or complex mods.
Backing up your server data regularly protects against loss or corruption. You can schedule automated backups using the game panel, making it easy to restore your game if needed. This ensures that your progress and settings are always secure and recoverable.
Setting up a Terraria dedicated server is easy with the right tools. At Iceline Hosting, we provide a user-friendly game panel, advanced security features, and dependable customer support to make server setup and management hassle-free.
Ready to take your Terraria experience to the next level? Set up your dedicated server with Iceline Hosting today.